用 Fedora 的时候,发现系统默认启用了 SELinux,还动不动弹警告窗口,于是稍微研究了一下。
我们平常经常接触的存取控制机制叫做自主式存取控制 (DAC, Discretionary Access Control),如 user/group/other 对文件的 rwx 权限就是 DAC。SELinux 是一种强制式存取控制 (MAC, Mandatory Access Control) 的实现(没错,SELinux 只是最常见的一种 MAC,其实还有 TOMOYO、AppArmor 等等),能够提供更细粒度的权限控制,如某个类型的进程被允许读某个类型的文件。
SELinux 的实现依赖 LSM (Linux Security Modules)。LSM 在很多 Linux 内核服务(如程序执行、文件操作、socket操作、IPC操作、内存段、信号量、sysctl、syslog、audit)中插入了 hook,第三方的存取控制机制如 SELinux、AppArmor、SMACK、TOMOYO 就是利用这些 hook 实现的。
在 SELinux 下,每个进程和资源都被赋予了 SELinux context (i.e. SELinux label),利用这些 context 可以编写一系列 rules 来定义进程和进程之间、进程和资源之间允许哪些交互(白名单方式,除非你在 rule 中显式地允许了,否则 SELinux 默认不允许任何交互,这就是为什么叫做强制式),这些 rules 组合在一起就是 SELinux policy。需要注意的是,DAC 和 MAC 是合作而不是互斥关系,要在通过 DAC 的检查后才能检查 SELinux policy 的 rules ,也就是说如果你的访问连 DAC 都过不去那就不用劳烦 SELinux 了。
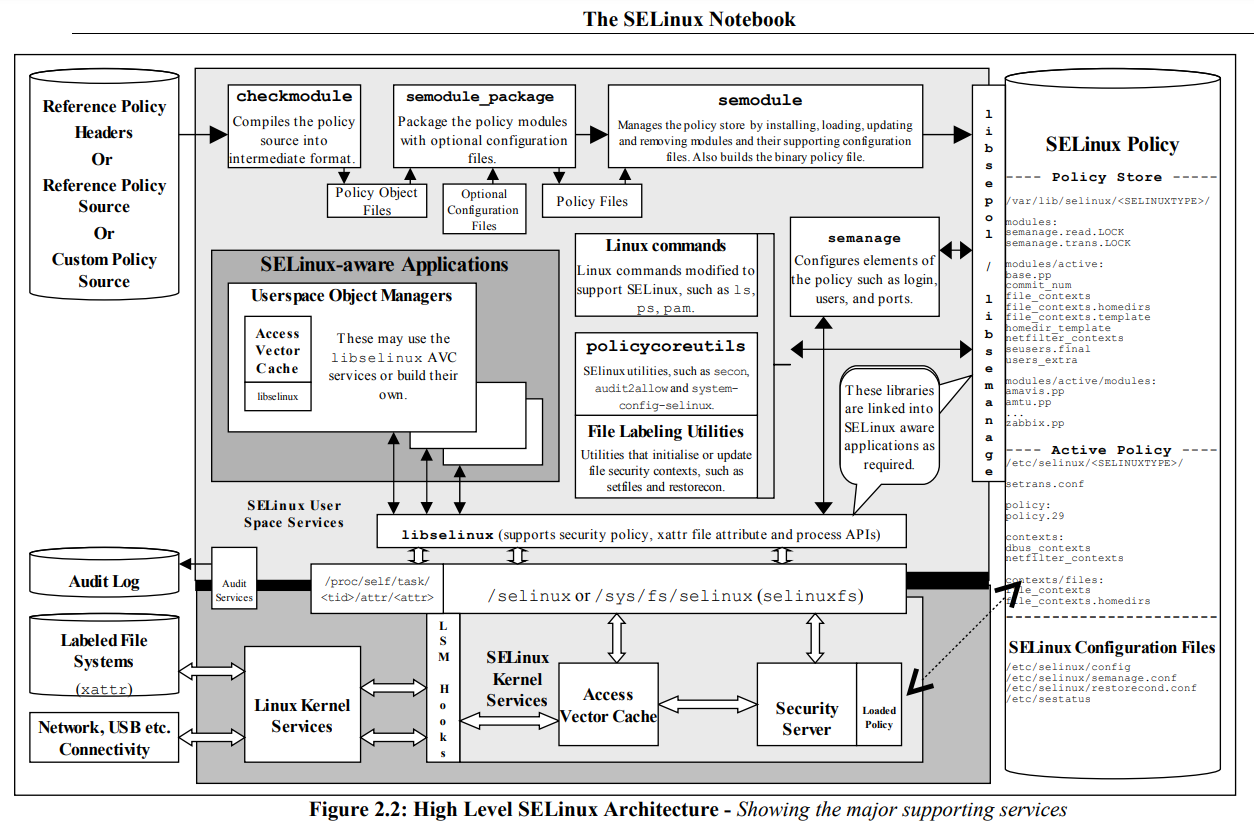
我从 SELinux Notebook 中截取了一张非常好的 SELinux 整体架构图(书中还有对这张图的解读),基本包罗万象,先放在开头供大家参考。
SELinux 模式#
SELinux 有三种模式:
- disabled:不启用 SELinux(强烈不建议切换为这个模式,会导致以后启动 SELinux 时要 relabel 所有资源)。
- permissive:启用 SELinux 但不实施 policy,允许所有访问但仍会记录拒绝日志。
- enforcing:启用 SELinux 并实施 policy,拒绝违规访问并记录拒绝日志。
有的应用不支持在 SELinux 下运行,所以有时候我们需要切换 SELinux 模式。如果内核支持 SELinux 开发模式 (内核参数 CONFIG_SECURITY_SELINUX_DEVELOP=y),则允许在 enforcing 和 permissive 之间切换,否则默认 enforcing 模式且无法切换;处于开发模式的内核也可以通过 setsebool secure_mode_policyload on 来禁止切换到 permissive,直到系统重启。
通过 getenforce 或 sestatus 查看当前模式。
1
2
3
4
5
6
| $ getenforce
Enforcing
$ sestatus | grep -i mode
Current mode: enforcing
Mode from config file: enforcing
|
切换模式有 3 种方法:
setenforce 0 切换为 permissive,setenforce 1 切换为 enforcing。- 系统启动时的默认模式是在配置文件 /etc/selinux/config 中定义的,可以通过修改这个文件并重启来切换模式。
- 内核参数优先级比配置文件更高,
enforcing=0 代表切换为 permissive。
非常不建议切换为 disabled 模式,如果非要如此,需要在 /etc/selinux/config 文件中配置 SELINUX=disabled 并重启。
除直接切换 SELinux 模式之外,SELinux 还允许单独标记一个 domain 为 permissive,即使系统仍然处于 enforcing 模式下。
 1
 2
 3
 4
 5
 6
 7
 8
 9
10
11
12
13
14
15
16
17
18
19
20
21
| # 查看所有 permissive domain
$ sudo semanage permissive -l
Builtin Permissive Types
bootupd_t
# 将 domain 标记为 permissive
$ sudo semanage permissive -a unconfined_t
$ sudo semanage permissive -l
Builtin Permissive Types
bootupd_t
Customized Permissive Types
unconfined_t
# 撤销 domain 的 permissive 标记
$ sudo semanage permissive -d unconfined_t
libsemanage.semanage_direct_remove_key: Removing last permissive_unconfined_t module (no other permissive_unconfined_t module exists at another priority).
|
当一个 domain 被标记为 permissive 时,这个应用表现为仿佛 SELinux 并没有启用,方便找出 SELinux 是否是 permission 问题的来源。如果一个应用需要禁用 SELinux,最好将它的 domain 标记为 permissive,而不是禁用整个系统的 SELinux。
如果已经切换为了 permissive 模式,可是还是有访问被拒绝,那有可能是有的应用是 SELinux aware 应用。大多数应用在 permissive 和 enforcing 模式下表现一样,但是有的 SELinux aware 应用(如 ssh、ls、id、gdb)会根据是否启用了 SELinux 而改变行为,比如即使在 permissive 模式下应用还是表现得跟 enforcing 模式下一样。
知道应用是否是 SELinux aware 的,有助于定位问题。可以通过检查应用是否动态链接了 libselinux 来确定应用是否是 SELinux aware 的。
1
2
3
4
5
6
| $ scanelf -n /usr/bin/ls
TYPE NEEDED FILE
ET_DYN libselinux.so.1,libcap.so.2,libc.so.6 /usr/bin/ls
$ ldd /usr/bin/ls | grep selinux
libselinux.so.1 => /lib64/libselinux.so.1 (0x00007fba45367000)
|
SELinux Context#
Linux 用户、进程、文件都具有 SELinux context,结合实例我们来看看 context 到底是什么。
 1
 2
 3
 4
 5
 6
 7
 8
 9
10
11
| # Linux 用户具有 context (实际上是这个 id 进程的 context)
$ id -Z
unconfined_u:unconfined_r:unconfined_t:s0-s0:c0.c1023
# 进程具有 context
$ ps -efZ | grep bash | grep -v grep
unconfined_u:unconfined_r:unconfined_t:s0-s0:c0.c1023 zhao 4082 3457 0 Jul16 pts/0 00:00:00 bas
# 文件具有 context
$ ls -Zd /home/
system_u:object_r:home_root_t:s0 /home/
|
Context 由四个项构成:SELinux user、SELinux role、SELinux type (进程的 type 又叫 domain)、level/range。其中最重要的就是 type 项,因为超过 99% 的 SELinux rules 都不会使用整个 context,而是只关心两个 type 之间的关系,这就是 TE (Type Enforcement)。
- SELinux user 项决定了可以切换为哪些 role。
- SELinux role 项决定了可以访问哪些 type,用户及用户的进程可以在这些 domain 下运行。
- SELinux type 项是最重要的,进程 domain 和文件 type 之间的关系决定了是否允许进程访问这个文件。
- level/range 项只有当 policy 支持 MCS/MLS 时才需要 。
SELinux User, Role and Type#
SELinux user 有一个有趣的特性:会话中永远保持不变。它不像有效用户 id 能够通过 su / sudo 改变,因此用户永远无法切换为他不应该具有的 role。SELinux user 还能用于编写一些 constraints,e.g. UBAC (User Based Access Control)。简单地说,如果一个 SELinux user 拥有的文件具有 ubac_constrained_type 这个 attribute,那么这个文件永远无法被其他 SELinux user (除 sysadm_u, root 和 system_u 外) 访问。
SELinux user 和多个 roles 之间的映射关系如下。
 1
 2
 3
 4
 5
 6
 7
 8
 9
10
11
12
13
14
| # 查看所有 SELinux user 以及
# SELinux user, roles 和 MLS/MCS levels 之间的映射关系
$ sudo semanage user -l
Labeling MLS/ MLS/
SELinux User Prefix MCS Level MCS Range SELinux Roles
guest_u user s0 s0 guest_r
root user s0 s0-s0:c0.c1023 staff_r sysadm_r system_r unconfined_r
staff_u user s0 s0-s0:c0.c1023 staff_r sysadm_r system_r unconfined_r
sysadm_u user s0 s0-s0:c0.c1023 sysadm_r
system_u user s0 s0-s0:c0.c1023 system_r unconfined_r
unconfined_u user s0 s0-s0:c0.c1023 system_r unconfined_r
user_u user s0 s0 user_r
xguest_u user s0 s0 xguest_r
|
可以看到 unconfined_u 允许的 roles 有 system_r 和 unconfined_r,因此 SELinux user 为 unconfined_u 的 Linux 用户就可以在这两个 roles 之间切换。
 1
 2
 3
 4
 5
 6
 7
 8
 9
10
11
12
13
14
15
16
17
18
19
20
21
22
23
24
25
26
27
28
29
30
31
32
33
34
35
36
37
38
39
40
41
42
43
| # Linux 用户当前的 role 是 unconfined_r
$ id -Z
unconfined_u:unconfined_r:unconfined_t:s0-s0:c0.c1023
# 切换失败,因为现在的映射中 unconfined_u 不允许访问 user_r
$ newrole -r user_r
unconfined_u:user_r:user_t:s0-s0:c0.c1023 is not a valid context
# 修改 SELinux 映射的 roles,添加一个 user_r
$ sudo semanage user -m -R "system_r unconfined_r user_r" unconfined_u
# 查看本地修改过的 SELinux user,unconfined_u 已经可以映射为 user_r 了
$ sudo semanage user -l -C
Labeling MLS/ MLS/
SELinux User Prefix MCS Level MCS Range SELinux Roles
unconfined_u user s0 s0-s0:c0.c1023 system_r unconfined_r user_r
# 先切到 permissive 模式,不然 newrole 会被 SELinux 拦截 (不明白)
$ sudo setenforce 0
# 现在就可以切换为 user_r 了
$ newrole -r user_r
Password:
# 切换成功
# 不过 type 为什么变成 user_t 了?
$ id -Z
unconfined_u:user_r:user_t:s0-s0:c0.c1023
# 原来 policy 中定义了 role 默认的 type
$ cat /etc/selinux/targeted/contexts/default_type
auditadm_r:auditadm_t
secadm_r:secadm_t
sysadm_r:sysadm_t
staff_r:staff_t
unconfined_r:unconfined_t
user_r:user_t
# 撤销这些改动
$ sudo setenforce 1
$ newrole -r unconfined_r
|
常见的一些 roles 有:
| role | description |
|---|
| user_r | 普通用户的 role,只允许执行用户应用 |
| staff_r | 和 user_r 类似,但可以受到更多系统信息,这个 role 通常给允许切换 role 的用户 |
| sysadm_r | 系统管理 role,小心使用 |
| system_r | 系统 role,不是给你切换 role 用的 |
Roles 又和多个 domain 具有映射关系。如果你启用一个应用失败了,最好看看你这个 Linux 用户的 role 是否允许该应用的 domain。
1
2
3
4
5
| # 查看指定的 role 允许哪些 domain
$ seinfo -r user_r -x
Roles: 1
role user_r types { abrt_helper_t alsa_home_t ... };
|
unconfined_t 这个 type/domain 值得特殊注意,顾名思义它是不受限的,或者说在 SELinux 中几乎可以做任何事。想让 SELinux 严管网络服务进程(如 sshd),就让它们在受限 domain 中运行;又不想让 SELinux 管普通的用户进程(如 shell、GUI 应用),就让它们在不受限 domain 中运行。但不止有 unconfined_t 这个 type 是不受限的,所有 attribute 为 unconfined_domain_type 的 type 都是不受限的。
1
2
3
4
5
6
7
| # 查看所有不受限的 type
$ seinfo -a unconfined_domain_type -x
Type Attributes: 1
attribute unconfined_domain_type;
NetworkManager_dispatcher_custom_t
...
|
只要进程 domain 是上面中的一个,且 SELinux 启用了不受限的 domain,进程就是不受限的。
那么怎么看 SELinux 是否启用了不受限的 domain 呢?当 SELinux 加载了 unconfined 这个 module 时,就启用了不受限的 domain。由于这个 module 提供了 unconfined_t 这个 type,也就是说所有 type 中有 unconfined_t 就代表启用了不受限的 domain。
 1
 2
 3
 4
 5
 6
 7
 8
 9
10
| # 有 unconfined_t,代表启用了不受限 domain
$ seinfo -t unconfined_t
Types: 1
unconfined_t
# 确实也加载了 unconfined module
$ sudo semodule -l | grep unconfined
unconfined
unconfineduser
|
MLS/MCS#
MLS (Multi-Level Security) 让 SELinux 支持 sensivity levels 和 categories。
- sensivity levels:不同 sensitivity levels 之间是有层级关系的。可以将某些内容标记为特定的敏感度或敏感度范围(当然大多资源只被标记为一个特定的敏感度),将进程标记为支持某一个敏感度或敏感度范围(最高值被叫做 clearance sensitivity,最低值叫做 current sensitivity)
- categories:不同 categories 之间没有任何关系,它应该要一一对应。categories 用于进一步微调,比如你想让用户能够访问某个敏感度的文件,但又只限于特定几种类型的文件
| Example | Current sensitivity level | Clearance sensitivity level | Category set |
|---|
| user_u:user_r:user_t:s0 | s0 (lowest sensitivity level) | s0 (lowest sensitivity level) | c0 (a default category, gets translated to “”) |
| user_u:user_r:user_t:s0-s0:c0.c15 | s0 (lowest sensitivity level) | s0 (lowest sensitivity level) | c0.c15 (range of c0 to c15) |
| user_u:user_r:user_t:s0-s2:c1,c4.c8 | s0 (lowest sensitivity level) | s2 | c1,c4.c8 (c1 plus c4 to c8) |
那么 MLS 是如何实现访问控制的呢?
MLS 会检查进程和目标资源的 context,看看它们之间的支配关系,有以下 4 中结果:
- 进程支配目标资源:进程的 sensivity level 大于等于目标资源的,且进程的 categories 是目标资源的超集。
- 目标资源支配进程:目标资源的 sensivity level 大于等于进程的,且目标资源的 categories 是进程的超集。
- 进程和目标资源的 sensivity level 和 categories 相同。
- 两者不可比较:无论 sensivity level 如何,两者都至少有一个对方没有的 categories。
然后 MLS policy 可以对一些权限进行限制。比如一个 policy 可以是:只有当进程的 context 支配目标资源的 context 时允许进行读操作,只有当目标资源的 context 支配进程的 context 时允许进行写操作。
MCS (Multi-Category Security) 是 MLS 的一个实现,但是只能有一个 sensivity level,因此完全依赖于 categories,确定支配关系也就更简单了:
- 进程支配目标资源:进程的 categories 是目标资源的超集。
- 目标资源支配进程:目标资源的 categories 是进程的超集。
- 两者不可比较:进程和目标资源都至少有一个对方没有的 categories。
MLS/MCS 常用于应用隔离。虚拟机用 categories 来让每个虚拟机在它们自己的 domain 内运行,从而相互隔离;安卓设备动态生成 MCS categories 来让不同用户运行的同一个 app 不能读写对方创建的文件。
Context for#
Linux User#
Linux 用户的 context 来源于登陆时,Linux 用户的 Login Name 会被映射为一个 SELinux user。
1
2
3
4
5
6
| # 查看 Linux 用户、 SELinux user 和 MLS/MCS range 之间的映射关系
$ sudo semanage login -l
Login Name SELinux User MLS/MCS Range Service
__default__ unconfined_u s0-s0:c0.c1023 *
root unconfined_u s0-s0:c0.c1023 *
|
若 Linux 用户没有在该映射关系中找到对应的 Login Name,就默认匹配 __default__(以 % 开头的 Login Name 是一个用户组)。可以看到例子中普通 Linux 用户都被映射为了 unconfined_u 这个 SELinux user。
File and Directory#
SELinux context 存储在文件拓展属性中,这需要文件系统的支持(ext2/3/4,xfs,btrfs 等等都支持),记得一定要在内核配置中启用这个 feature 哦。
用 ls -Z、getfattr -m security.selinux 和 stat 都可以查看文件的 context。
 1
 2
 3
 4
 5
 6
 7
 8
 9
10
| $ ls -dZ /var/log/audit/
system_u:object_r:auditd_log_t:s0 /var/log/audit/
$ getfattr -m security.selinux -d /var/log/audit/
getfattr: Removing leading '/' from absolute path names
# file: var/log/audit/
security.selinux="system_u:object_r:auditd_log_t:s0"
$ stat /var/log/audit/ | grep Context
Context: system_u:object_r:auditd_log_t:s0
|
文件 context 是从哪里来的? 为每个文件指定一个默认的 context 是不现实的,所以 policy 作者使用正则来定义文件默认的 context。通过 semange fcontext 可以查看文件默认 context 的定义(数据源在 /etc/selinux/<SELINUXTYPE>/contexts/files/)。
1
2
3
4
5
| # 查看文件默认 context 的定义
# 以 /var/log/audit/ 为例
$ sudo semanage fcontext -l | grep auditd_log_t
/var/log/audit(/.*)? all files system_u:object_r:auditd_log_t:s0
/var/log/audit\.log.* regular file system_u:object_r:auditd_log_t:s0
|
以上输出内容解析如下:
| 匹配的文件路径 | 匹配的文件类型 | 默认 context |
|---|
| /var/log/audit(/.*)? | all files | system_u:object_r:auditd_log_t:s0 |
这一条定义了 /var/log/audit 这个目录本身以及目录下的所有文件的默认 context。根据这些定义,用 matchpathcon 可以查看某个文件的默认 context 应该是什么。
1
2
3
| # 看,确实符合定义的默认 context 吧~
$ matchpathcon /var/log/audit/audit.log
/var/log/audit/audit.log system_u:object_r:auditd_log_t:s0
|
用 restorecon 可以比对文件的 context 和它的默认 context,并重置文件 context (customizable types 不会被重置,除非加上 -F 选项):若不同,则将文件的 context 的 type 恢复为默认值 (带 -F 选项才会修改整个 context);若文件没有 context,则赋予它默认的 context。
1
2
3
4
5
6
| # 没有输出,代表文件的 context 和默认值一样
$ sudo restorecon -v /var/log/audit/audit.log
# 递归目录
$ sudo restorecon -Rv /etc/
Relabeled /etc/yum.repos.d/docker-ce.repo from unconfined_u:object_r:user_tmp_t:s0 to unconfined_u:object_r:system_conf_t:s0
|
在有的发行版里,如果你在根目录下创建一个 .autorelabel 文件,下次开机时就会自动对所有文件进行 restorecon。
1
2
| $ touch /.autorelabel
$ reboot
|
用 semanage fcontext 还可以添加和删除文件默认 context 定义。
 1
 2
 3
 4
 5
 6
 7
 8
 9
10
11
| # 添加默认 context 定义
$ sudo semanage fcontext -a -t user_home_t "/home/user/.config(/.*)?"
# 修改文件的默认 context 后,记得 restorecon
$ restorecon -Rv /home/user/.config/
...
# 删除默认 context 定义
$ sudo semanage fcontext -d -t user_home_t "/home/user/.config(/.*)?"
$ restorecon -Rv /home/user/.config/
...
|
使用 chcon (change context) 来手动改变文件的 context。
Process#
通过 ps -Z 查看进程 context:
1
2
3
4
| $ ps -efZ | grep auditd | grep -v grep
system_u:system_r:kernel_t:s0 root 65 2 0 Jul16 ? 00:00:00 [kauditd]
system_u:system_r:auditd_t:s0 root 850 1 0 Jul16 ? 00:00:00 /sbin/auditd
system_u:system_r:auditd_t:s0 root 852 850 0 Jul16 ? 00:00:00 /usr/sbin/sedispatch
|
Maintaining Context#
Default object rules#
Default object rules 可以定义一个新对象的默认 context。
 1
 2
 3
 4
 5
 6
 7
 8
 9
10
11
| # 查看 default_user
$ seinfo --all | grep default_user
# 查看 default_role
$ seinfo --all | grep default_role
# 查看 default_type
$ seinfo --all | grep default_type
# 查看 default_range
$ seinfo --all | grep default_range
|
以下是一个例子:
1
2
3
| # When computing the context for a new file object, the user
# will be obtained from the target context.
default_user file target;
|
file 类型的文件的 SELinux user 部分会从目的/源的 context 获得。
Context 继承#
SELinux 中,继承 context 是默认的行为:如果 policy 中没有指定别的,则新建的任何东西都会继承它父级元素的 context。当然 Security-aware 应用也可以覆盖这些默认行为,自定义创建时的默认 context。
- 进程:一个 context 为
foo_t 的进程 fork 出的新进程的 context 就是 foo_t (只要 policy 中没有 rule 指定了别的值)。 - 文件:在 context 为
bar_t 的目录下新建的文件的 context 也是 bar_t (只要 policy 中没有 rule 指定了别的值)。
既然是继承,那么追究到底应该有一个 root context:
- 进程的 root context 是
kernel_t (这是 kernel 的 context,kernel 产生了 init 进程,init 继而产生了所有其他进程)。 - 文件的 root context 是
root_t。
新建文件时,文件的 context 是什么呢?
- user 部分继承创建文件这个进程的 (还可能受 policy 中的
default_user rule 影响) - role 部分大多默认为
object_r (还可能受 policy 中的 role_transition 和 default_role rule 影响) - type 部分默认继承父目录的(还可能受 policy 中的
type_transition 和 default_type rule 影响) - range / level 部分默认为创建文件这个进程的 low/current level(还可能受 policy 中的
range_transition 和 default_range rule 影响)
上面的 role/type/range_transition 见 Context Transition 章节,default_user/role/type/range 见 Default object rules 章节。
当复制和移动文件时,文件的 context 会发生什么变化呢?
- 复制的文件会继承所在目录的 context (除非使用
cp --preserve=context);若复制时要覆盖已存在的文件,会保留已存在文件的 context。 - 移动的文件会保留原来的 context。
Context Transition#
如果新建文件不想继承父目录的 context,新进程不想继承父进程的 context 咋办?以进程为例,我们知道进程是通过 fork & exec 创建的, policy 作者可以定义 domain 转换规则,这样就可以覆盖掉默认的继承行为,让 exec 可执行文件后生成的进程具有想要的 domain。接下来以 sshd 进程为例:
1
2
3
4
| # 查看 sshd 进程及父进程的 context
$ pstree -s -Z -p $(pidof sshd)
systemd(1,`system_u:system_r:init_t:s0')
└─sshd(50275,`system_u:system_r:sshd_t:s0-s0:c0.c1023')
|
可以看到 sshd 进程是直接通过 systemd 进程 fork & exec 生成的,systemd 进程的 domain 为 init_t,sshd 进程的 domain 为 sshd_t。这是因为 policy 定义了 domain 转换规则:
1
2
3
4
5
6
7
8
| # 查看 type_trans 类型的 rules
# 果然找到了!
$ sesearch --type_trans -c process | grep init_t | grep sshd_t
type_transition init_t sshd_exec_t:process sshd_t;
# sshd 可执行文件的 type 是 sshd_exec_t
$ ls -Z /usr/sbin/sshd
system_u:object_r:sshd_exec_t:s0 /usr/sbin/sshd
|
这条 rule 的含义是: domain 为 init_t 的进程执行 type 为 sshd_exec_t 的文件时,生成的进程 domain 为 sshd_t。
要让这种转换能够生效,必须同时满足 3 个条件:
- 父进程的 domain 被允许转换为目的 domain
- 父进程的 domain 对可执行文件具有执行权限
- 可执行文件的 type 被指定为了目的 domain 的 entrypoint
第一个条件要求必须有一条 rule 允许 domain init_t 转换为 domain sshd_t。
1
2
3
4
5
6
7
8
9
| # 找到了
$ sesearch -s init_t -t sshd_t -c process -p transition -A
allow initrc_domain daemon:process transition;
# 上面的 initrc_domain 和 daemon 分别是包含 init_t 和 sshd_t 的 attribute 啦
$ seinfo -a initrc_domain -x | grep init_t
init_t
$ seinfo -a domain -x | grep sshd_t
sshd_t
|
因此第一个条件是满足的。
第二个条件要求 domain 为 init_t 的进程必须要有 type 为 sshd_exec_t 的文件的执行权限。
1
2
3
4
| # 果然找到了这条 rule
# 同样的,下面的 initrc_domain 和 direct_init_entry 分别是包含 init_t 和 sshd_exec_t 的 attribute 啦
$ sesearch -s init_t -t sshd_exec_t -c file -p execute -A
allow initrc_domain direct_init_entry:file { execute getattr map open read };
|
因此第二个条件也是满足的。
第三个条件要求 type 为 sshd_exec_t 的文件必须是 domain 为 sshd_t 的进程的 entrypoint。
 1
 2
 3
 4
 5
 6
 7
 8
 9
10
11
12
| # 查看 sshd_exec_t 是哪些 domain 的 entrypoint
$ sesearch -t sshd_exec_t -c file -p entrypoint -A
allow container_kvm_t exec_type:file entrypoint;
allow sandbox_x_domain exec_type:file { entrypoint execute execute_no_trans getattr ioctl lock map open read };
allow spc_t exec_type:file entrypoint;
allow sshd_t sshd_exec_t:file { entrypoint execute execute_no_trans ioctl lock map open read };
allow svirt_sandbox_domain exec_type:file { entrypoint execute execute_no_trans getattr ioctl lock map open read };
allow virtd_lxc_t exec_type:file entrypoint;
# sshd_exec_t 确实是 sshd_t 的 entrypoint
$ sesearch -s sshd_t -t sshd_exec_t -c file -p entrypoint -A
allow sshd_t sshd_exec_t:file { entrypoint execute execute_no_trans ioctl lock map open read };
|
经过验证,三个条件都是满足的。
SELinux 日志#
启用 SELinux 时,基本所有拒绝访问的信息会被记录到日志中。当 Linux auditing 启用时,这些拒绝信息会被 auditd 记录到 /var/log/audit/audit.log 中,同时也会记录到系统日志 /var/log/messages 中。
SELinux 作出的允许 / 不允许访问的决定会被缓存为 AVC (Access Vector Cache)。AVC 是内核中 SELinux 安全子系统的一部分,任何需要检查的 permission 表现为一个 access vector,先查询 cache,看这个 permission 之前是否被检查过,如果有,则检查结果直接从 cache 中获得,否则要去查询 policy。
 1
 2
 3
 4
 5
 6
 7
 8
 9
10
11
12
13
14
| # 查看 /var/log/messages
$ sudo grep AVC /var/log/messages | tail -n 1
Jul 17 18:00:39 LOCAL audit[32045]: AVC avc: denied { read } for pid=32045 comm="gdb" name="renderD128" dev="devtmpfs" ino=510 scontext=system_u:system_r:abrt_t:s0-s0:c0.c1023 tcontext=system_u:object_r:dri_device_t:s0 tclass=chr_file permissive=0
# 查看 /var/log/audit/audit.log
$ sudo grep AVC /var/log/audit/audit.log | tail -n 1
type=AVC msg=audit(1689588039.802:1838): avc: denied { read } for pid=32045 comm="gdb" name="renderD128" dev="devtmpfs" ino=510 scontext=system_u:system_r:abrt_t:s0-s0:c0.c1023 tcontext=system_u:object_r:dri_device_t:s0 tclass=chr_file permissive=0
# 通过 ausearch 查看
# 用 ausearch 与直接看日志文件相比,优点在于可以方便地根据时间、进程命令、pid、uid 等条件进行筛选
$ sudo ausearch -m avc -ts recent | tail -n 3
----
time->Mon Jul 17 18:00:39 2023
type=AVC msg=audit(1689588039.802:1838): avc: denied { read } for pid=32045 comm="gdb" name="renderD128" dev="devtmpfs" ino=510 scontext=system_u:system_r:abrt_t:s0-s0:c0.c1023 tcontext=system_u:object_r:dri_device_t:s0 tclass=chr_file permissive=0
|
能看懂日志是非常重要的,以上的日志的解析如下:
| Log part | Description |
|---|
| type=AVC | 日志类型 |
| msg=audit(1689588039.802:1838) | 时间戳 |
| avc: | 还是日志类型 |
| denied | SELinux 采取的反应,可以是 denied / granted。在 permissive 模式下尽管允许操作但还是会记录为 denied |
| { read } | 进程请求执行的行为 |
| for pid=32045 | 进程的 pid |
| comm=“gdb” | 进程的命令内容(不带参数) |
| name=“renderD128” | 目标文件名 |
| dev=“devtmpfs” | 目标文件所在的设备或文件系统 |
| ino=510 | 目标文件的 inode 号。由于所在设备 / 文件系统已知,通过 inode 即可以定位到这个文件 |
| scontext=system_u:system_r:abrt_t:s0-s0:c0.c1023 | 进程的 domain |
| tcontext=system_u:object_r:dri_device_t:s0 | 目标文件的 context |
| tclass=chr_file | 目标资源的种类,chr_file 代表字符设备文件 |
因此,这条日志可以解读为:SELinux 拒绝 了进程 gdb (pid=32045) 对 文件系统 devtmpfs 上的文件 renderD128 (inode=510) 进行 read 操作。简单验证一下,果然如此。
 1
 2
 3
 4
 5
 6
 7
 8
 9
10
11
| $ df -hT /dev
Filesystem Type Size Used Avail Use% Mounted on
devtmpfs devtmpfs 4.0M 0 4.0M 0% /dev
# devtmpfs 文件系统的 inode 510 果然是 renderD128 文件
$ find /dev -inum 510
/dev/dri/renderD128
# tcontext 也对上了
$ ls -Z /dev/dri/renderD128
system_u:object_r:dri_device_t:s0 /dev/dri/renderD128
|
隐藏日志#
有的应用可能会试图获取实际上根本用不着的访问权限,这些访问即使被拒绝也不会影响应用的运行。为了避免这些没啥意义的拒绝日志搅混水,SELinux policy 的作者可以编写一些 dontaudit 类型的 rule 来隐藏这些日志。
1
2
3
4
5
6
7
8
9
| # 查看有多少 dontaudit 类型的 rule
$ seinfo | grep audit
Auditallow: 171 Dontaudit: 8686
Auditallowxperm: 0 Dontauditxperm: 0
# 查看所有 dontaudit rules
# 数量是不是刚好符合 seinfo 的数据 ^^
$ sesearch --dontaudit | wc -l
8686
|
如果怀疑一个应用因为 SELinux 出了问题,结果又没找到相应的日志,那可能就是 dontaudit 的锅。可以让 policy 忽略 dontaudit,这样所有拒绝信息都会记录在日志中了。
1
2
3
4
5
| # 忽略 dontaudit 并 rebuild policy (要花一点时间执行)
$ sudo semodule --disable_dontaudit --build
# 看到多出来的这些日志太烦了,再重新启用 dontaudit
$ sudo semodule --build
|
自动分析日志#
现在我们已经找到并且理解了问题日志,但是人工解读还是太麻烦了,而且也不知道怎么解决这些问题啊,好在有一些非常方便的工具可以根据问题日志自动生成解决办法,比如 RH 系发行版提供的 sealert。sealert 背后是 setroubleshootd 这个 daemon,能够将日志翻译为易读的信息,并给出处理建议:
 1
 2
 3
 4
 5
 6
 7
 8
 9
10
11
12
13
14
15
16
17
18
19
20
21
22
23
24
25
26
27
28
29
30
31
32
33
34
35
36
37
38
39
40
41
42
43
44
45
46
47
48
49
50
51
52
53
54
55
56
57
58
59
60
61
62
63
64
65
66
| # 在系统日志里找 setroubleshootd 的日志
$ sudo grep "LOCAL setroubleshoot" /var/log/messages
# 或者直接看 setroubleshootd 这个 service 的日志 (更方便更美观)
# 可以看到会给出建议以及置信度
$ journalctl _SYSTEMD_UNIT=setroubleshootd.service
Jul 17 18:00:31 LOCAL setroubleshoot[31733]: SELinux is preventing gdb from read access on the chr_file renderD128. For complete SELinux messages run: sealert -l 87dc21ed-af2d-4cd5-82c7-ddbf2017738b
Jul 17 18:00:31 LOCAL setroubleshoot[31733]: SELinux is preventing gdb from read access on the chr_file renderD128.
***** Plugin catchall (100. confidence) suggests **************************
If you believe that gdb should be allowed read access on the renderD128 chr_file by default.
Then you should report this as a bug.
You can generate a local policy module to allow this access.
Do
allow this access for now by executing:
# ausearch -c 'gdb' --raw | audit2allow -M my-gdb
# semodule -X 300 -i my-gdb.pp
# 我觉得上面这些信息已经够用了,想要更详细,可以用上面日志中提示的 alert ID 让 sealert 分析
$ sealert -l 87dc21ed-af2d-4cd5-82c7-ddbf2017738b
SELinux is preventing gdb from read access on the chr_file renderD128.
***** Plugin catchall (100. confidence) suggests **************************
If you believe that gdb should be allowed read access on the renderD128 chr_file by default.
Then you should report this as a bug.
You can generate a local policy module to allow this access.
Do
allow this access for now by executing:
# ausearch -c 'gdb' --raw | audit2allow -M my-gdb
# semodule -X 300 -i my-gdb.pp
Additional Information:
Source Context system_u:system_r:abrt_t:s0-s0:c0.c1023
Target Context system_u:object_r:dri_device_t:s0
Target Objects renderD128 [ chr_file ]
Source gdb
Source Path gdb
Port <Unknown>
Host LOCAL
Source RPM Packages
Target RPM Packages
SELinux Policy RPM selinux-policy-targeted-38.20-1.fc38.noarch
Local Policy RPM selinux-policy-targeted-38.20-1.fc38.noarch
Selinux Enabled True
Policy Type targeted
Enforcing Mode Enforcing
Host Name LOCAL
Platform Linux LOCAL 6.3.12-200.fc38.x86_64 #1 SMP
PREEMPT_DYNAMIC Thu Jul 6 04:05:18 UTC 2023
x86_64
Alert Count 2
First Seen 2023-07-17 18:00:23 CST
Last Seen 2023-07-17 18:00:29 CST
Local ID 87dc21ed-af2d-4cd5-82c7-ddbf2017738b
Raw Audit Messages
type=AVC msg=audit(1689588029.380:1816): avc: denied { read } for pid=31797 comm="gdb" name="renderD128" dev="devtmpfs" ino=510 scontext=system_u:system_r:abrt_t:s0-s0:c0.c1023 tcontext=system_u:object_r:dri_device_t:s0 tclass=chr_file permissive=0
Hash: gdb,abrt_t,dri_device_t,chr_file,read
# 或者可以让 sealert 直接分析 audit.log 日志文件中的所有 AVC 类型日志 (不建议,可能会分析很久)
$ sudo sealert -a /var/log/audit/audit.log
|
如果你的桌面环境下有 SELinux Alert Brower 这个应用(Fedora Workstation 就自带),看见这些分析信息应该很熟悉,每次 SELinux 出问题这家伙都会蹦出来啊!
没有 setroubleshootd 和 sealert 也可以用 audit2why 进行分析:
1
2
3
4
5
6
7
8
| # audit2why 的分析,说了跟没说一样...
$ sudo ausearch -m avc -ts today | tail -n 1 | audit2why
type=AVC msg=audit(1689588039.802:1838): avc: denied { read } for pid=32045 comm="gdb" name="renderD128" dev="devtmpfs" ino=510 scontext=system_u:system_r:abrt_t:s0-s0:c0.c1023 tcontext=system_u:object_r:dri_device_t:s0 tclass=chr_file permissive=0
Was caused by:
Missing type enforcement (TE) allow rule.
You can use audit2allow to generate a loadable module to allow this access.
|
不管怎样,无论是 setroubleshootd, sealert 还是 audit2why,给出的解决办法都是用 audit2allow 生成 allow rule,让它以模块的形式加载进内核,这就是接下来要讲的 module 了,见 Module 章节。
先看看 audit2allow 生成的 allow rule 到底长啥样。
1
2
3
4
5
6
7
8
| $ sudo ausearch -m avc -ts today | tail -n 1
type=AVC msg=audit(1689588039.802:1838): avc: denied { read } for pid=32045 comm="gdb" name="renderD128" dev="devtmpfs" ino=510 scontext=system_u:system_r:abrt_t:s0-s0:c0.c1023 tcontext=system_u:object_r:dri_device_t:s0 tclass=chr_file permissive=0
# 参考上面这个拒绝日志,audit2allow 生成的 allow rule 是不是简单粗暴、对症下药
$ sudo ausearch -m avc -ts today | tail -n 1 | audit2allow
#============= abrt_t ==============
allow abrt_t dri_device_t:chr_file read;
|
SELinux Policy#
SELinux 用 policy store 来跟踪它加载的 modules 和相关设置,包含 SELinux policy 二进制文件。当前使用的 policy store 可以通过 sestatus 看到:
1
2
| $ sestatus | grep Loaded
Loaded policy name: targeted
|
开机后默认使用的 policy store 可以通过 /etc/selinux/config 中的 SELINUXTYPE 项设置,加载到内存中的二进制 policy 文件位于 /etc/selinux/<SELINUXTYPE>/policy/policy.<version>。
Module#
SELinux policy 支持模块化 policy,一个模块化 policy 由一个 base policy 以及零或多个 module 组成,每个 module 对应一个特定的应用或者服务。这些 module 被编译、链接为二进制文件,加载到 security server 中。可以用 audit2allow 一步一步生成、构建 module policy。
 1
 2
 3
 4
 5
 6
 7
 8
 9
10
11
12
13
14
15
16
17
18
19
20
21
22
23
| # 1. 生成 .te 结尾的 module policy 源文件 (te 代表 type enforcement)
$ sudo ausearch -m avc -ts today | tail -n 1 | audit2allow -m my-gdb > my-gdb.te
# 查看内容,如果你懂的话可以手动修改
$ cat my-gdb.te
module my-gdb 1.0;
require {
type abrt_t;
type dri_device_t;
class chr_file read;
}
#============= abrt_t ==============
allow abrt_t dri_device_t:chr_file read;
# 手动构建 module policy
# 2. 编译 module,当前目录下会多出来一个 my-gdb.mod 文件 (这个 .mod 文件只是一个中间产物)
$ checkmodule -M -m -o my-gdb.mod my-gdb.te
# 3. 创建 package,当前目录下会多出来一个 my-gdb.pp 文件
$ semodule_package -o my-gdb.pp -m my-gdb.mod
|
或者可以一步到位:
1
2
3
4
5
6
7
| # 直接生成并构建 module policy,这不就是之前 setroubleshootd 和 sealert 给出的解决办法嘛!
# 当前目录下多出来 my-gdb.te 和 my-gdb.pp 两个文件
$ sudo ausearch -m avc -ts today | tail -n 1 | audit2allow -M my-gdb
******************** IMPORTANT ***********************
To make this policy package active, execute:
semodule -i my-gdb.pp
|
这两种办法生成的 .te 和 .pp 文件都是一模一样的,所以直接用 audit2allow -M 就好。不管用哪种方法,得到了 .pp 文件,最后一步就是用 semodule 把它加载进内核。
 1
 2
 3
 4
 5
 6
 7
 8
 9
10
11
12
13
14
15
16
17
18
19
20
| # install module 进内核(要执行一会)
$ sudo semodule -i my-gdb.pp
# 查看 enable 的 modules
# 加载后默认就 enable 了
$ sudo semodule -l | grep my-gdb
my-gdb
# 查看所有 modules
$ sudo semodule -lfull | grep my-gdb
400 my-gdb pp
# remove module
# 注意不要带 .pp 的后缀!
$ sudo semodule -r my-gdb
libsemanage.semanage_direct_remove_key: Removing last my-gdb module (no other my-gdb module exists at another priority).
# 检查一下,确实都没有了
$ sudo semodule -l | grep my-gdb
$ sudo semodule -lfull | grep my-gdb
|
我们不仅可以 install / remove module,还可以 enable / disable module。当有的 module 被其他 module 依赖,但我们又不需要它自己的 rules 时,就可以 disable 但不 remove 它。
 1
 2
 3
 4
 5
 6
 7
 8
 9
10
| # disable module (要执行一会)
$ sudo semodule -d my-gdb
# 检查一下,确实 disable 了
$ sudo semodule -l | grep my-gdb
$ sudo semodule -lfull | grep my-gdb
400 my-gdb pp disabled
# enable module (要执行一会)
$ sudo semodule -e my-gdb
|
Boolean#
Policy 作者编写 policy 时,可以定义一些 boolean flag 及其默认值,然后根据它们的值实时地启用或禁用一些 rules。用 getsebool 和 semanage boolean -l 都可以查看所有 boolean:
 1
 2
 3
 4
 5
 6
 7
 8
 9
10
11
12
13
14
15
| # 查看所有 boolean
$ getsebool -a | tail -n 1
zoneminder_run_sudo --> off
# 用 semanage boolean 可以看到对该 boolean 的解释
$ sudo semanage boolean -l | tail -n 1
zoneminder_run_sudo (off , off) Allow zoneminder to run sudo
# 还可以只显示本地修改过的 boolean
$ sudo semanage boolean -l -C
SELinux boolean State Default Description
httpd_can_sendmail (off , off) Allow httpd to can sendmail
virt_sandbox_use_all_caps (on , on) Allow virt to sandbox use all caps
virt_use_nfs (on , on) Allow virt to use nfs
|
查看受 boolean 影响的 rules:
1
2
3
4
| # 查看 boolean 影响的 allow rules
$ sesearch -b httpd_can_sendmail -A
allow httpd_suexec_t mta_exec_type:lnk_file { getattr read }; [ httpd_can_sendmail ]:True
...
|
用 setsebool 和 semanage boolean -m 都可以即时地修改 boolean 的值。semanage boolean -m 会直接持久化修改, setsebool 只有带 -P 选项才会持久化修改(用 semanage boolean -l 看这个 boolean 的 Default 项改变了就是持久化了)。
 1
 2
 3
 4
 5
 6
 7
 8
 9
10
11
12
13
14
| # 关闭 boolean
# 用 setsebool
$ sudo setsebool httpd_can_sendmail off
$ sudo semanage boolean -m --off httpd_can_sendmail
$ getsebool httpd_can_sendmail
httpd_can_sendmail --> off
# 开启 boolean
$ sudo setsebool zoneminder_run_sudo on
$ sudo semanage boolean -m --on httpd_can_sendmail
$ getsebool httpd_can_sendmail
httpd_can_sendmail --> on
|
Rules#
Rules 有 allow、dontaudit、auditallow、neverallow 几种,通常 rule 的格式如下:
1
| rule_name source_type target_type : class perm_set;
|
其中最常见的就是 allow rule 了。allow rule 检查 source_type 和 target_type 之间的操作是否允许,如下是一个例子。
1
2
3
4
| # Using the allow rule to show that initrc_t is allowed access
# to files of type acct_exec_t that have the getattr, read and
# execute file permissions:
allow initrc_t acct_exec_t:file { getattr read execute };
|
这条 allow rule 的含义是允许 initrc_t 访问(访问操作包括 getattr, read, execute) type 为 acct_exec_t 的 文件。
怎么看一个进程是否允许访问一个文件呢? 看下面这个例子:
 1
 2
 3
 4
 5
 6
 7
 8
 9
10
11
| # 查看 auditd 进程的 domain
$ ps -efZ | grep auditd
system_u:system_r:auditd_t:s0 root 850 1 0 Jul16 ? 00:00:00 /sbin/auditd
# 查看 /var/log/audit/audit.log 的 type
$ sudo ls -Z /var/log/audit/audit.log
system_u:object_r:auditd_log_t:s0 /var/log/audit/audit.log
# 查看 *auditd_t* 这个 domain 是否可以 *write* *auditd_log_t* 这个 type 的 *file*
$ sesearch --allow --source auditd_t --target auditd_log_t --class file --perm write
allow auditd_t auditd_log_t:file { append create getattr ioctl link lock open read rename setattr unlink watch watch_reads write };
|
找到了这一条 allow rule,因此 auditd 进程能够写 /var/log/audit/audit.log 文件。
Attributes#
为了方便地给一组 types 定义 rule,可以声明 attribute 给 types 分组。
 1
 2
 3
 4
 5
 6
 7
 8
 9
10
11
12
13
14
15
16
17
18
19
20
| # 查看所有 attributes
$ seinfo -a
Type Attributes: 260
abrt_domain
...
# 查看包含指定 type 的所有 attributes
$ seinfo -t unconfined_t -x
Types: 1
type unconfined_t alias unconfined_crontab_t, application_domain_type, ...;
# 查看一个 attribute 包含哪些 types
$ seinfo -a application_domain_type -x
Type Attributes: 1
attribute application_domain_type;
NetworkManager_dispatcher_chronyc_t
...
|
Constraints#
Constraints 描述的是允许 actor (processes, user, …) 对 objects (files, directories, processes, …) 执行 action。通过普通的 SELinux rules 的检查后,还要检查 constraints,进一步限制了允许的操作。定义 constraints 和 TE 类似也是白名单方式。
- 当编写了 constraints, 允许在符合某些条件的情况下进行某些操作,SELinux 才会允许该操作进行(当然也必须通过 TE 的 rules)。
- 如果没有符合的 constraints,即使 TE rule 允许了,也会被拒绝执行。
和 TE 不同的是,TE 只用 context 中的 type 一项,而 constraints 用整个 context 并且更针对执行的操作而不是 domain。
1
2
3
4
5
6
| # 查看所有 constraints
$ seinfo --constrain
Constraints: 142
constrain alg_socket { create relabelfrom relabelto } (u1 == u2 or ( t1 == can_change_object_identity ));
...
|
这个 contstraint 的含义是:只有当两者 context 的 SELinux user 部分相同或者 domain 具有 can_change_object_identity 这个 attribute 时,domain 允许进行 create 和 relabelfrom/to 操作。
UBAC#
最有名的 constraint 就是 UBAC (User Based Access Control) 了。UBAC 目的在于保护某个 SELinux user 拥有的文件不被其他 SELinux user 访问,想要访问必须满足以下 4 个条件之一:
- actor 的 SELinux user 和 object 的 SELinux user 相同。
- actor 的 SELinux user 或 object 的 SELinux user 是
system_u。 - actor 的 type 或 object 的 type 没有
ubac_constrained_type 这个 attribute (非常重要的一条)。 - actor 的 type 有
ubacfile, ubacproc, ubackey 等 attributes 中的一个。
写了这么多,只是为了知其所以然。探究 context 从何而来很复杂,也没多大意义,实际上很少有人需要深入利用 SELinux,无非是在系统弹出警告时应付一下罢了,实践中知道这个 context 为什么有问题,怎么解决问题就好。
 1
 2
 3
 4
 5
 6
 7
 8
 9
10
11
12
13
14
15
16
17
18
19
20
21
22
23
24
25
26
27
28
29
30
31
32
33
34
35
36
37
38
39
40
41
42
43
44
45
46
47
48
49
50
51
52
53
54
55
56
57
| # 查看 SELinux 整体信息
$ sestatus
$ seinfo
# permissive domain
$ semanage permissive -l # 查看所有 permissive domain
$ semanage permissive -a <domain> # 将 domain 标记为 permissive
$ semanage permissive -d <domain> # 撤销 domain 的 permissive 标记
# SELinux 模式
$ getenforce # 查看当前模式
$ setenforce 0 # 设置模式为 permissive
$ setenforce 1 # 设置模式为 enforcing
# 查看 context
$ id -Z
$ ps -Z
$ ls -Z
# 查看映射关系
$ semanage login -l # Linux user -> SELinux user
$ semanage user -l # SELinux user -> roles
$ seinfo -r <role> -x # roles -> domains
$ semanage fcontext -l # 文件路径正则 -> 默认 context
$ sesearch --type_trans -c process # 可执行文件 type -> 进程 domain
$ seinfo -t <type> -x # type -> attribute
$ seinfo -a <attr> -x # attribute -> type
$ sesearch -b <boolean> -A # boolean -> allow rules
$ matchpathcon <filename> # 查看指定文件的默认 context
$ restorecon -Rv <filename> # 恢复默认 context
# 切换 role
$ newrole -r <role>
# 查看 log
$ cat /var/log/messages
$ cat /var/log/audit/audit.log
$ ausearch -m avc -ts recent
# 分析 log
$ journalctl _SYSTEMD_UNIT=setroubleshootd.service
$ sealert -l <alert ID>
$ ausearch -m avc -ts today | tail -n 1 | audit2why
# module
$ sudo ausearch -m avc -ts today | tail -n 1 | audit2allow -M <module> # log -> allow rules -> module
$ semodule -i <module.pp> # 加载 module
$ semodule -r <module> # 移除 module
$ semodule -l # 查看生效的 module
# boolean
$ semanage boolean -l # 查看所有 boolean
$ setsebool <boolean> [on/off] # 修改 boolean
# 筛选显示 policy 中的 rules
sesearch -s <source type> -t <target type> -c <class>
|
Further Reading#